Showing posts with label wool. Show all posts

Thursday, January 13, 2011

Military Coat & Buttons

i found this awesome, amazing, wonderful old wool military jacket at value village, way back in november.  it was $10!  for a perfect wool coat!  although it was rather very large on me and the arms were way to long, i had visions of altering, de- and re- constructing it, and making it my very own.  the photos make it look much more gray than it actually is.  it's the perfect military, olive, drab green that i adore.

i thought i had before pictures so i could show you the jacket how i actually found it, with all the original military buttons still attached.  but no, there are no photos, or there are but i am not organized enough to find them now.  anyhow, imagine the jacket with big ugly plastic and brass military buttons and that's what it look liked when i discovered it.  i immediately thought of changing out the buttons, actually that was the whole point of having to have it, that it would be a super easy upgrade and simple way to make the jacket my own, if I could figure out how to alter the fit.  when i got the jacket home i started to get out my vintage button stash.  originally i was going with a combo of vintage blue, green and red buttons, all mix matched, all over the coat.  in all the jacket has 10 buttons.  the belt that came with the jacket had a heavy brass buckle on it.  cool, but didn't go with my buttons.  so i am digging thru a tin of buttons still on cards and low and behold, i come across two, yes 2!, vintage red belt buckles.  that settled it right there.  i wanted all red buttons, to go with the buckle and because the color just pops right off the green background.
the tin of buttons still on cards where i found the buckles

i keep all my loose buttons in old glass and silver coffee servers.  one is all shell buttons, one is all other white buttons and the other two are missed colors.


the unused belt buckle and the original price tag on the back.


above you can see one the remedies i came up with to make the sleeves work for me.  originally i thought i was seriously going to have to remove the entire sleeve, alter it, and reattach it to the coat body.  it seemed daunting and that's one reason it took me a couple months to actually start dealing with the coat.  but then as i was looking at it, i thought, why don't i just turn a bit of the sleeve under and hand stitch some embroidery thread around it and call it good.  o.k.  so i love how this stitching turned out, very "hand done" looking.  i was happy with the stitching but the arms and sleeves still fit weird, like way huge and bulky on me.  
 
inside view.  not fancy.  but fine.

 so then i figure i might as well try taking out some of the shoulder pad stuff that was in between the jacket and the lining so i ended up trimming away as much of that as i could get my hands on.  i got a lot of bulk out but the sleeves themselves were still big and bunchy so then i had a brilliant idea and said to myself, "hey, just wash it.  in really hot soapy water. and dry the hot heck out of it. it's wool.  just see what happens." 
i figured the worse that could happen is the sleeves would shrink and felt down too short.  in which case i would just undo the crooked embroidery thread stitching i just did and let it out.  turns out though, that washing it was just what it needed.  it shrunk perfectly and i love how it fits now.  it is slender and narrow through the torso yet the arms are full enough to allow me to really stretch and feel comfortable, yet not huge and gigantic.  the red buttons are fully functional and that darn buckle just sets it off! 
I love my "new" coat!

the only thing i might still do to it is put a bunch of patches down one arm.  when i first got the jacket it had a military patch on each shoulder at the top of the sleeve.  over at Honestly...WTF i had fallen in love with this look and thought the idea might translate well to this coat.
here are some patches i have that may, or may not, end up on the jacket:
  this is a large vintage patch i bought from my friend Marie at the antique mall for like $2.

and here are a few smaller.

i will post more photos if i add the patches but for now i think i will just go with it as is and see i decide to tackle all the detailed work of attaching patches.

working on a silver tote bag,
xox
jennette


Tuesday, December 14, 2010

New - Old Sweaters

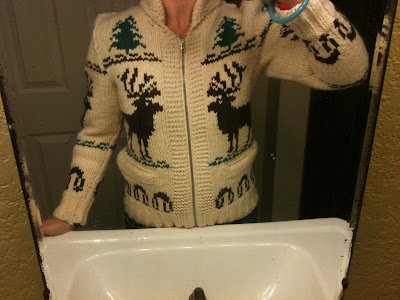
So my Aunt Charlene saw my previous post about the Granted-type sweater I found at the Flea Market for $30.  It looks like this:


And it reminded her of the sweaters my Grandma knit (first photo, above)for her and my Uncle Steve, way back in the very early 70s, when Grandma was still working at Boeing and before my cousin Marci or I were born.  My aunt sent me an email a couple days ago and asked if I would want them, when we met at my Grandma's today for lunch, since she had had them in storage for many many years.  YES!  YES!  I want them!

August LOVES the sweater that fits him.  He says he feels like he should be wearing it on a college campus!  Can't you tell he thinks he looks good!  He does look good!
My Grandma knit them in wool and she even lined them!  They zip up and they don't have pockets but that's OK.

August is showing you the lining here.

So the other sweater fits me great but Gus is not thrilled that we have "matching" sweaters.  I told him that I wont wear mine when he wears his, but otherwise it's fair game!  Some day Jasper will fit into mine and then they can be matchy matchy brothers!

We LOVE our new - old sweaters!  Thanks Aunt Charlene and Uncle Steve!  Thank you Grandma for being a knitter back in the day!  I so adore having these family treasures and I love to use them!

Merry Yule and Blessed Solstice everyone!

xoxo
Jennette


Monday, October 4, 2010

Wool Pants

The Felted Blanket Wool Pants, first attempt, are Done!

OK, all you nature school friendz.  Here they are!  The first go round of super thick, warm, soft and felted wool pants cut from an old wool blanket that I felted in the washer.  What do ya think?  I wish you could see and feel these in person.  If I played in the woods every week for several hours I would certainly be making myself a pair, stat!
Here they are unhemmed.  Jasper was not so sure about these at first.  They really are SO thick.  But now they are hemmed and he is getting used to what they feel like.  I think they will be superb when worn with his REI undergarments.  To me they are super soft but his sensitive skin may need the long-john barrier.  I left off the pockets for now since the front ones on this pattern require sewing them into the side seems.  I could see no way that my machine would play nice with that much thickness!  I have an old pair of his cargo pants that I may just cut the pockets off of and attach to these.  They would be cotton pockets but I think it would be OK.  Also, I may use a contrasting felted wool piece to make knee patches but I can add these or pockets any time.  For now he just needs a chance to wear them for a day to see how they hold up.  It was so nice on Friday he wore "regular" clothes to Tracks and Tales.

Here is a back view.  I used the thickest felted blanket I had to try to ensure durability.  I have several more blankets but I am thinking they wont felt up as thick as this.  Which makes me wonder if I can make these for other children and have them last.  I was hoping to make and sell some but I would need to feel good about the undestructiveness of the pants!  I have a load of blankets in the wash now so we will see if they felt as thick as this.  This particular blanket has a nice basket weave type of pattern to it as well that seems to add to its strength.

I used a vintage canvas type material for the waistband and draw string.  We'll see how this holds up too.  The drawstrings are attached to elastic that goes across the back but inside the waistband.  And the elastic is stretched a bit and attached to the side seems where it also attaches to the drawstrings.  Does that make sense?  So the elastic can't move around and the drawstrings finish up the job of cinching the pants on tight enough to stay up.  This method works nicely to prevent losing your drawstrings inside your waistband casing.

So the experiments continue!  All the extra length on these just got hemmed up to the inside so I can let the hem out as Jasper continues to become a giant!  And if they last that long.  I was concerned about the hemming because that doubled again the thickness I was trying to sew through.  But it worked!  My machine complained just a tad but with a little finessing it cooperated.
What are you all making, upcycling, or repurposing these days?
Do what you love friendz!  Make art, create, imagine!

Don't Follow your Head, just Follow Your Heart.
xoxox -
Jennette