Showing posts with label felting. Show all posts

Monday, October 4, 2010

Wool Pants

The Felted Blanket Wool Pants, first attempt, are Done!

OK, all you nature school friendz.  Here they are!  The first go round of super thick, warm, soft and felted wool pants cut from an old wool blanket that I felted in the washer.  What do ya think?  I wish you could see and feel these in person.  If I played in the woods every week for several hours I would certainly be making myself a pair, stat!
Here they are unhemmed.  Jasper was not so sure about these at first.  They really are SO thick.  But now they are hemmed and he is getting used to what they feel like.  I think they will be superb when worn with his REI undergarments.  To me they are super soft but his sensitive skin may need the long-john barrier.  I left off the pockets for now since the front ones on this pattern require sewing them into the side seems.  I could see no way that my machine would play nice with that much thickness!  I have an old pair of his cargo pants that I may just cut the pockets off of and attach to these.  They would be cotton pockets but I think it would be OK.  Also, I may use a contrasting felted wool piece to make knee patches but I can add these or pockets any time.  For now he just needs a chance to wear them for a day to see how they hold up.  It was so nice on Friday he wore "regular" clothes to Tracks and Tales.

Here is a back view.  I used the thickest felted blanket I had to try to ensure durability.  I have several more blankets but I am thinking they wont felt up as thick as this.  Which makes me wonder if I can make these for other children and have them last.  I was hoping to make and sell some but I would need to feel good about the undestructiveness of the pants!  I have a load of blankets in the wash now so we will see if they felt as thick as this.  This particular blanket has a nice basket weave type of pattern to it as well that seems to add to its strength.

I used a vintage canvas type material for the waistband and draw string.  We'll see how this holds up too.  The drawstrings are attached to elastic that goes across the back but inside the waistband.  And the elastic is stretched a bit and attached to the side seems where it also attaches to the drawstrings.  Does that make sense?  So the elastic can't move around and the drawstrings finish up the job of cinching the pants on tight enough to stay up.  This method works nicely to prevent losing your drawstrings inside your waistband casing.

So the experiments continue!  All the extra length on these just got hemmed up to the inside so I can let the hem out as Jasper continues to become a giant!  And if they last that long.  I was concerned about the hemming because that doubled again the thickness I was trying to sew through.  But it worked!  My machine complained just a tad but with a little finessing it cooperated.
What are you all making, upcycling, or repurposing these days?
Do what you love friendz!  Make art, create, imagine!

Don't Follow your Head, just Follow Your Heart.
xoxox -
Jennette


Wednesday, June 16, 2010

Another Monster Sweatshirt


Here are the wool felt monsters i made for Jasper and Rowan, just like Iorek's.


This one is/will be Jasper's

This one is Rowan's

Just like Iorek's, Rowan's Birthday Sweatshirt has his birth year too, 03

Rowan likes his Monster Sweatshirt but I have not been able to catch up with him to get a photo of it on him.  Once I find a plain sweatshirt for Jasper, I will finish his and then I will try to get a photo of all three boys in their sweatshirts, together.  Seeing all three, almost finished, made a few of us in our craft group want to make some for ourselves.  Not monsters though....... What should we have?  Whatever it is, I doubt we will be adding our birth years to ours!  Maybe we will come up with a name for this craft group and then we can have it opposite our emblem!  Ha! 
The most likely name for our craft group right now would fall along the lines of : Crafty Wine Swillin' Mamas, or, Mamas Craft and Stitch and Bitch, or, Eat, Drink, & Craft Mamas!

Sew, Stitch, and Mend.  Make, Create, and Imagine.  Smile and Dance.  Do what you Love!


Thursday, May 27, 2010

Rib Cage Love


Dianah's rib cage sweatshirt

Way back in January, I guess it was, according to Dianah, she herself told me about this great sweatshirt she had seen in a local shop here in Seattle.  She wanted it SO BAD but couldn't afford the over $100 price tag.  Of course we LOVE to support our local hand-makers but there just wasn't room in her budget for a new $100 plus sweatshirt. 

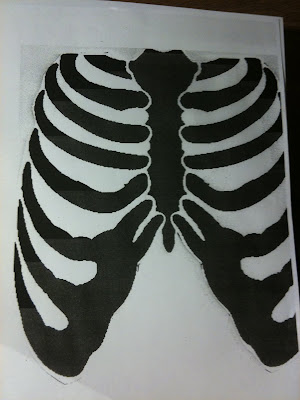
enlarged stencil found on Internet

So she is telling me about it, on and on, I love it, I love it, I love it, and I am just thinking, the whole time, I will just make you one for your birthday.  How hard could it be?  I did finally, a few months later, make my way to see THE actual sweatshirt and low and behold, I KNEW I could duplicate it, make something very similar, but with my little touches and have it be close enough that it would still be the sweatshirt Di had been coveting.  Also, it wouldn't cost me nearly $100 to make!

stencil cut out and layed out

So as Dianah's birthday was approaching I was making my way toward the final design and implementation of said design onto a great, almost new, but totally second hand, thrifted black zip-up hoody sweatshirt.  The sweatshirt was the only one little tricky piece to this operation.  I knew if I looked long and hard enough I could find a great one used and not have to buy a brand new one.  It was just a matter of staying on the hunt!  The sweatshirt was located at one of the many fantastic thrift stores in Tucson, Arizona!  When we were there in April I still hadn't found the ideal zip hoody but since I was thrifting my toosh off every day I finally scored the perfect one!

some wool felt pieces cut out and layed out

  In the photos you will see some the steps it took me to get to the final stage: Di loving it and wearing it every. single. day.  Once I had it finished and could see for myself how well it turned out, I just could not wait to give it to her.  It was killing me to not talk about it to her and just give it to her as soon as I was done.  When she did finally open her gift I was jumping up and down like a child and clapping my hands!  What a goof ball!  But it was perfect because we were having a fire in our "tiny" backyard pit and she was cold and needed a hoody to be warm so I tore into the house, grabbed the gift bag, and shoved it in her hands.  "Open, open, open," I demanded!  She was thrilled!  Smiles all around!

pinning in progress

So besides locating the sweatshirt, I had a few other items to attend to.  I had to find a stencil to suit me.  Also, I knew I was adding the little hear under the ribs because that was big part of what Di liked about the original hoody, but thankfully I know how to make hearts so that was an easy step!  The search online for rib cage stencils didn't take long and I was able to enlarge it on my printer/scanner to get the size I wanted.  I only needed to cut out one side of the cage to make the entire thing because each side was the exact same.  Go figure!  The sternum part was a big guessing game because I could not remember if the "original" had one but after much debate between Chad and I, we both decided it looked cool, splitting the one in the stencil, down the middle, and having the zipper go up through the middle of it. 

 
close up of pinning. 

I didn't have any white wool felt on hand so I got that at Ben Franklin.  I got the red there too but a few months back when I was working on Iorek's birthday sweatshirt.  Iorek is Dianah's son and Jasper's real good friend.  I will do a post of his sweatshirt soon!  Anyhow, besides the felt I just needed a million tons of pins!  Some of you know that when I sew, I usually don't use pins at all, or very little.  But for a project like this, you will lose your mind if you try to go pinless!  I knew for best results I would need to pin the heck out of it, get lots of pokes, and I would end up with the perfect finished product! 


the entire thing PINNED!

So then it was time to sew!  I just picked a place and started!  What else can you do?!  I just made sure my sewing machine was loaded with good white thread and began.  As I got one rib done, I would take the pins out and cut the loose threads so I could begin to see what it would look like.  I got into a rhythm and just blissed out on it.  Zen sewing, if you will.  It is thrilling to have a project come together so easily and be able to see your progress so quickly.  It empowers you.  I felt like Super Sewer Girl Super Hero with no seam ripping being my Super Power!

almost finished!  label applied.  heart hand sewing left to do.

I did finish with inserting one of my own home made labels.  And I knew I was going to finish the heart by hand sewing the edges, in between the ribs.  Once that was all done, it was ready to go.  I was so excited by how it turned out!  Very pleased!


close up of hand stitching on heart.

You can see the machine stitching on the ribs in the picture above.  Some places I got too close to the edge and didn't want to chance it not being well attached so I just went back over those spots and restitched inside, more on the rib.  I did not seam rip the original stitching, in those cases, I just left them double stitched and I really like how it gives it more character and makes it look really handmade. 
And oh,  I always use wool felt too, never acrylic.  Not only is the wool natural fiber and much preferred, it will also begin to bind to the sweatshirt each time it is washed.  Oh the wonder of wool!


Dianah in her sweatshirt!!!

Make a gift, give it with love, and be happy!

Create, Upcycle, Reuse, and Make!


Wednesday, January 13, 2010

Cashmere Schmazmere


I dont know about you but I have a storage tub full of cashmere sweaters that have been awaiting my attention. I'd say half of them have been felted down and half are begging to be washing machine felting. The ones that have been felted have been a great source of amusement for making fun hand/wrist warmers and some funky sweaters. Amazingly, one of the the thickest, most gorgeous vintage sweaters, felted perfectly down to the size of my rather big-for-his-age 6 year old. He is delighted beyond what I can express in words and is always asking, "Mom, can I wear 'the sweater'?" As if its the only swaeter he has. But if you could feel how soft and warm this little sweater is, you would want to wear it every day too. And to make it even more desirable, it has ended up with the sweetest woodland scene on it! I LOVE wool and cashmere! So versatile to use and design with since once felted you can cut to your hearts content and no unraveling occurs. Love it! So with the rest of the scraps from those other felted cashmere sweaters in the tub, I came up with this woodland scene that is so darn tootin cute, I can't stand it, and I want one for me! I tend to make myself the more deconstructed looking, slap it together, and call it a sweater, kind of sweaters. I'll post some pictures of those too as I wade thru all the completed and half finished projects I have goin' on around here. So here, for eye candy and hopefully inspiration, are a couple photos of "the sweater." Most of the appliqued pieces were machine stitched on and then a few of the pieces I added embroidery to give them more definition. There is the big tree, a bird nest with eggs, a bird, a mushroom and a yellow bunny! J wanted a gnome but we couldnt figure out where to squeeze him in so he will be on the next one, probably a vest, that I do for him. The bigger the applique, the easier it is to maneuver and manipulate. The mushroom is layered and machine stitced and also hand stitched. Just depends on how intense and time consuming you want your objects to be that determines which process you use to get there. I will try to post soon on some of the handwarmers and other sweaters I have done or are working on currently. Enjoy! And spend some time felting and sewing for yourself or someone you love. It will make you happy!